How HTTP Works: What Really Happens When You Open a Website?
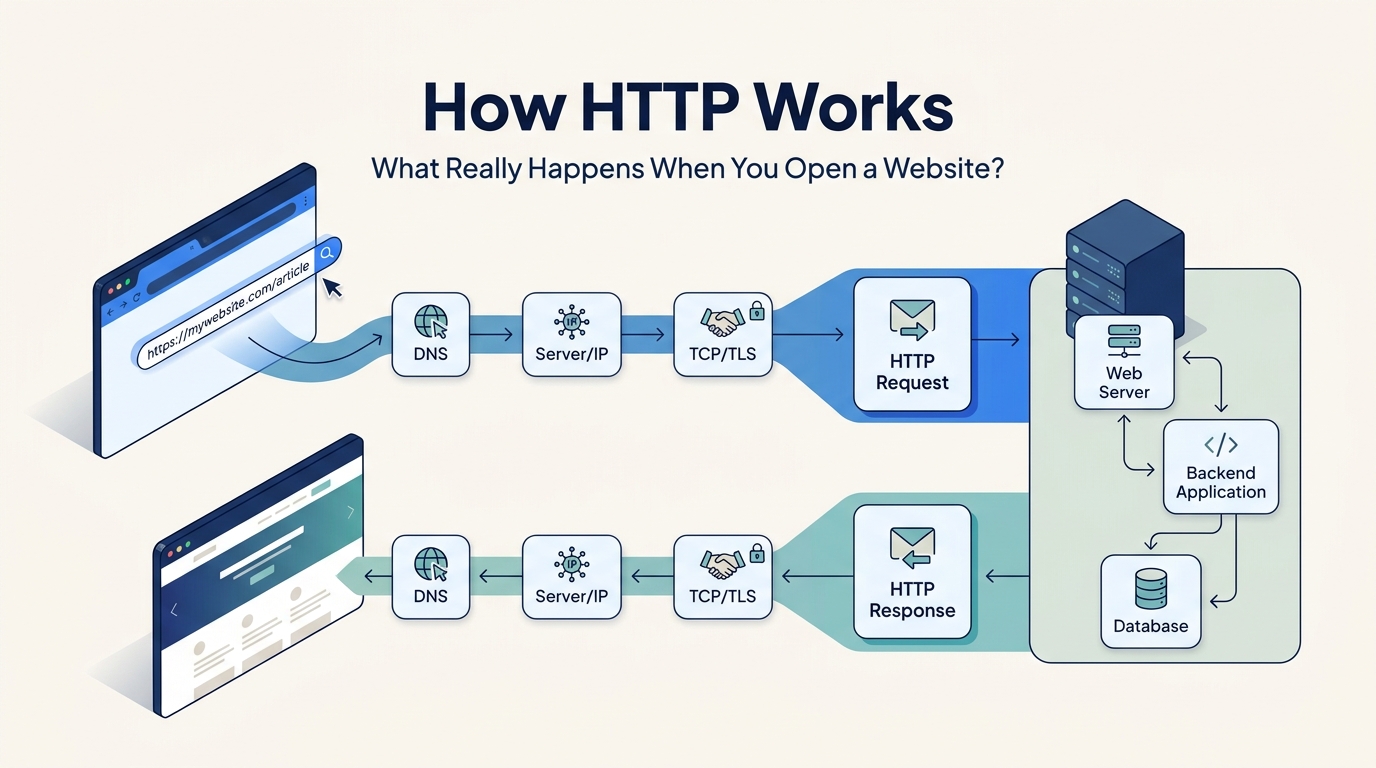
You type a URL into your browser, press Enter, and a website appears.
It feels almost instant.
But between pressing Enter and seeing the page, your browser and the server go through quite a few steps.
The browser has to find the server, establish a connection, send an HTTP request, wait for the server to process it, possibly query a database, receive an HTTP response, and finally turn that response into something you can see and interact with.
If you're learning web development, understanding this process is worth the time.
Once you understand what actually happens during a request, concepts like APIs, Flask, JavaScript fetch(), HTTP status codes, authentication, databases, and debugging start making much more sense.
Let's walk through the whole process from the browser to the server and back again.
The Short Version
At a very high level, opening a website looks something like this:
Browser → DNS → Server → HTTP Request → Backend → Database → HTTP Response → Browser
That's the simplified version.
In reality, there are several steps between each of these.
For example, before the browser can send an HTTP request, it needs to know where the server is. It gets that information through DNS.
If you're using HTTPS, the browser also needs to establish a secure connection.
Then the web server may pass the request to an application server, which may execute Python, PHP, Node.js, or another backend application.
That application might query a database before generating the response.
So let's start from the beginning.
1. You Enter a URL
Imagine you open:
https://example.com
Your browser doesn't immediately know where example.com is hosted.
The domain name is designed for humans.
Computers ultimately need an IP address such as:
93.184.216.34
So one of the first things the browser needs to do is resolve the domain name.
That's where DNS comes in.
2. DNS Finds the Server
DNS stands for Domain Name System.
You can think of DNS as the internet's directory service.
It translates a domain name into an IP address.
Conceptually:
example.com
      ↓
     DNS
      ↓
93.184.216.34
Your browser can then use that IP address to communicate with the server.
DNS resolution can involve several layers, including browser caches, operating system caches, DNS resolvers, and authoritative DNS servers.
Fortunately, you don't normally need to think about all of that when building an application.
The important idea is:
DNS turns a human-friendly domain name into an address the network can use.
3. The Browser Connects to the Server
Now the browser knows where the server is.
For HTTPS websites, the browser needs to establish a secure connection before sending normal HTTP data.
This involves the underlying network connection and TLS encryption.
You may have seen URLs beginning with:
https://
The https part means HTTP is being transported over a secure TLS connection.
The simplified idea is:
Browser
   ↓
TCP connection
   ↓
TLS security
   ↓
Secure HTTP communication
TLS is responsible for things such as encrypting the communication and helping the browser verify that it is talking to the intended server.
You don't manually implement this in most web applications. Your web server, reverse proxy, hosting platform, or CDN usually handles it.
4. The Browser Sends an HTTP Request
Once the connection is ready, the browser can send an HTTP request.
A simplified request might look like this:
GET / HTTP/1.1
Host: example.com
Accept: text/html
User-Agent: Mozilla/5.0
There are a few important pieces here.
HTTP method
The method tells the server what kind of operation the client is requesting.
For example:
GET
POST
PUT
PATCH
DELETE
URL path
This tells the server which resource is being requested.
For example:
/
or:
/api/users
Headers
Headers provide additional information about the request.
For example:
Content-Type: application/json
Authorization: Bearer token
Accept: application/json
The exact headers depend on what the client and server are doing.
5. HTTP Methods
HTTP provides several methods for communicating intent.
GET
Usually used to retrieve data.
GET /api/users
POST
Usually used to create something or submit data.
POST /api/users
PUT
Commonly used to replace an existing resource.
PUT /api/users/42
PATCH
Usually used to partially update a resource.
PATCH /api/users/42
DELETE
Used to remove a resource.
DELETE /api/users/42
The important thing is not to memorize these mechanically.
Think about what the client is trying to do.
For example:
GET    → Give me this
POST   → Create this
PUT    → Replace this
PATCH  → Change part of this
DELETE → Remove this
6. Where Does the Request Actually Go?
A production website often has more than one component handling a request.
For example:
Browser
   ↓
Internet
   ↓
Nginx
   ↓
Application Server
   ↓
Flask
   ↓
Database
This is where web development starts becoming more interesting.
The server receiving the connection may not be the application itself.
A reverse proxy such as Nginx may receive the request first.
It can handle things such as:
HTTPS termination
Static files
Routing
Compression
Request forwarding
Load balancing
Then it can forward dynamic requests to the application.
For a Flask application, the request may eventually reach a WSGI server and then your Flask code.
7. Flask Receives the Request
Let's make this practical.
Suppose we have a Flask endpoint:
from flask import Flask, jsonify

app = Flask(__name__)


@app.route("/api/users", methods=["GET"])
def get_users():
    users = [
        {"id": 1, "name": "John"},
        {"id": 2, "name": "Sarah"}
    ]

    return jsonify(users)


if __name__ == "__main__":
    app.run(debug=True)
If the browser sends:
GET /api/users
Flask looks at the URL and HTTP method.
It finds this route:
@app.route("/api/users", methods=["GET"])
and executes:
get_users()
The function creates a Python list:
users = [
    {"id": 1, "name": "John"},
    {"id": 2, "name": "Sarah"}
]
Then:
return jsonify(users)
converts that Python data into a JSON HTTP response.
That's a simple example, but the same basic idea is behind much larger APIs.
8. The Server Sends an HTTP Response
The browser sent a request.
Now the server needs to respond.
A simplified response could look like:
HTTP/1.1 200 OK
Content-Type: application/json

[
  {"id": 1, "name": "John"},
  {"id": 2, "name": "Sarah"}
]
Notice that the response contains more than just the data.
It includes:
HTTP version
Status code
Response headers
Response body
The status code tells the client what happened.
For example:
200 OK
means the request was successfully processed.
9. HTTP Status Codes You Should Know
You don't need to memorize every HTTP status code.
A handful of them cover a large portion of everyday development.
| Status | Meaning |
|---|---|
| 200 | Request succeeded |
| 201 | Resource created |
| 204 | Success with no response body |
| 400 | Bad request |
| 401 | Authentication required |
| 403 | Access forbidden |
| 404 | Resource not found |
| 500 | Server-side error |
These codes become especially useful when debugging APIs.
For example, if your frontend receives:
404 Not Found
the problem is probably different from receiving:
500 Internal Server Error
A 404 usually means the requested resource or route wasn't found.
A 500 means something went wrong while the server was processing the request.
That distinction can save a lot of debugging time.
10. JavaScript Can Make HTTP Requests Too
HTTP isn't limited to loading webpages.
Modern web applications constantly make HTTP requests from JavaScript. A page can load first, then JavaScript can communicate with an API in the background to retrieve data, submit forms, search for content, or update part of the interface without requiring a full page reload.
For example:
async function loadUsers() {
    const response = await fetch(
        "http://127.0.0.1:5000/api/users"
    );

    const users = await response.json();

    console.log(users);
}

loadUsers();
The browser runs this JavaScript.
fetch() sends the HTTP request to Flask.
Flask processes the request and returns JSON.
JavaScript then reads that JSON and can use the data to update the page.
The flow is:
JavaScript
     ↓
fetch()
     ↓
Flask API
     ↓
JSON response
     ↓
JavaScript
     ↓
Update the page
This basic request-and-response pattern appears almost everywhere in modern web development. A dashboard might use it to retrieve account data. A search interface might use it to fetch results as the user types. An online tool or puzzle site can use the same general browser-to-server communication model to retrieve or process data without reloading the entire page.
For example, Unscramble It is an interactive web application where the browser provides the interface while application logic processes the user's input and produces results.
The important point isn't the particular framework being used. React, Vue, Angular, Svelte, and plain JavaScript can all communicate with backend APIs using HTTP. The browser is simply acting as an HTTP client, while the server handles the application logic and sends a response back.
11. POST Requests and JSON
GET requests are only part of the story.
Suppose we want to create a new user.
The browser could send:
POST /api/users
Content-Type: application/json
with a JSON body:
{
    "name": "Michael"
}
Using JavaScript:
async function createUser() {
    const response = await fetch(
        "http://127.0.0.1:5000/api/users",
        {
            method: "POST",
            headers: {
                "Content-Type": "application/json"
            },
            body: JSON.stringify({
                name: "Michael"
            })
        }
    );

    const data = await response.json();

    console.log(data);
}
Now Flask can read the JSON:
from flask import Flask, jsonify, request

app = Flask(__name__)


@app.route("/api/users", methods=["POST"])
def create_user():
    data = request.get_json()

    name = data.get("name")

    return jsonify({
        "message": "User created",
        "name": name
    }), 201


if __name__ == "__main__":
    app.run(debug=True)
The important part is:
data = request.get_json()
Flask takes the JSON sent by the client and turns it into Python data that your application can work with.
So the request cycle becomes:
JavaScript
    ↓
POST + JSON
    ↓
Flask
    ↓
request.get_json()
    ↓
Python
    ↓
JSON response
    ↓
JavaScript
This is one of the fundamental patterns you'll use when building APIs.
12. What Happens When a Database Is Involved?
Real applications usually don't keep their data inside a Python list.
They use a database.
For example, instead of:
users = [
    {"id": 1, "name": "John"}
]
your Flask application might query PostgreSQL or MySQL.
Conceptually:
Browser
   ↓
Flask API
   ↓
Database
   ↓
Flask API
   ↓
Browser
The application might execute a query similar to:
SELECT id, name, email
FROM users
WHERE id = 42;
The database returns the result.
Flask processes that result and usually turns it into JSON.
For example:
{
    "id": 42,
    "name": "John",
    "email": "john@example.com"
}
The browser receives that response and can then update the UI.
This is why understanding HTTP alone isn't enough for backend development.
You eventually need to understand how HTTP, application code, and databases fit together.
13. HTTP Is Stateless
One concept that causes confusion when people first learn web development is the idea that HTTP is stateless.
In simple terms, each HTTP request is treated independently.
Imagine a user sends:
GET /profile
The server processes that request.
Then the same user sends another request:
GET /orders
The second request doesn't automatically contain all the context from the first one.
Applications therefore use additional mechanisms when they need to maintain state.
Common examples include:
Cookies
Sessions
Authorization headers
Access tokens
Refresh tokens
For example, a browser might send a cookie with subsequent requests so the server can associate those requests with a logged-in session.
This is one of the foundations of authentication systems.
14. HTTP vs HTTPS
You will often hear developers say:
"Use HTTPS."
The difference is important.
HTTP sends application data without TLS encryption.
HTTPS uses HTTP over a secure TLS connection.
So instead of:
HTTP
you normally want:
HTTPS
for production websites.
HTTPS helps protect data while it is being transmitted between the client and server.
This is particularly important for:
Login credentials
Session cookies
Personal information
Payment information
API tokens
Modern browsers and hosting platforms make HTTPS much easier to deploy than it used to be, but understanding what it actually does is still important.
15. How Developers Actually Debug HTTP Problems
This is where understanding the request lifecycle becomes really useful.
When something doesn't work, don't immediately start changing random code.
First find out where the request failed.
Your browser's Developer Tools are one of the best places to start.
Open:
Developer Tools → Network
Then reload the page.
You'll see requests similar to:
GET  /api/users       200
GET  /api/users/99    404
POST /api/users       500
Now you can inspect individual requests.
Look at:
Request URL
HTTP method
Status code
Request headers
Request payload
Response headers
Response body
Timing
This often tells you exactly what is happening.
16. A Simple Debugging Approach
Suppose your frontend says:
Failed to load users
Don't immediately assume the database is broken.
Work backwards.
Step 1: Was the request sent?
Check the Network tab.
If there is no request, the problem may be in your frontend JavaScript.
Step 2: Did the request reach the server?
If the request exists but can't connect, check the server URL, port, proxy, or network configuration.
Step 3: Did the route match?
If Flask returns:
404 Not Found
check the URL and HTTP method.
Step 4: Did the backend throw an error?
If you get:
500 Internal Server Error
check your Flask logs and traceback.
Step 5: Did the database query work?
If your Flask code reaches the database and fails there, investigate the query, connection, schema, permissions, or database server.
Step 6: Did the frontend correctly process the response?
The server may have returned valid JSON, but your JavaScript could still be expecting a different structure.
This approach is much faster than guessing.
17. The Complete Request Lifecycle
Now let's put everything together.
When you open a website, a simplified version of the journey looks like this:
User
  ↓
Browser
  ↓
DNS
  ↓
Server IP
  ↓
TCP / TLS
  ↓
HTTP Request
  ↓
Web Server
  ↓
Backend Application
  ↓
Database
  ↓
Backend Application
  ↓
HTTP Response
  ↓
Browser
  ↓
Rendered Website
Of course, modern production systems can be much more complicated.
There may be:
CDNs
Load balancers
Reverse proxies
Caches
Multiple application servers
Microservices
Message queues
Multiple databases
Object storage
External APIs
But the underlying idea remains the same.
A client makes a request.
The server processes it.
The server sends a response.
The client does something with that response.
18. Why This Matters for Developers
You don't need to become a networking expert before building websites.
But understanding the request lifecycle changes how you approach development.
For example, when a page isn't loading, you can ask:
Did DNS resolve?
Then:
Did the connection succeed?
Then:
Was the HTTP request sent?
Then:
Did the web server receive it?
Then:
Did the application route match?
Then:
Did the backend code succeed?
Then:
Did the database query succeed?
And finally:
Did the browser correctly process the response?
That's a much better debugging mindset than simply thinking:
"The website isn't working."
19. A Practical Mental Model
Whenever you're working with a website or API, keep this simple model in your head:
Client
  ↓
Request
  ↓
Server
  ↓
Application
  ↓
Data
  ↓
Response
  ↓
Client
Most web development problems can be located somewhere along that path.
Your frontend might send the wrong request.
Your server might reject it.
Your backend route might not exist.
Your application might throw an exception.
Your database might return an error.
Or the backend might return perfectly valid data that the frontend doesn't know how to handle.
Once you start thinking in terms of requests and responses, these problems become much easier to isolate.
Conclusion
HTTP is one of those technologies that can look complicated when you first encounter it.
There are domains, DNS, IP addresses, TCP, TLS, headers, methods, status codes, servers, frameworks, databases, cookies, APIs, and plenty of other concepts around it.
But the core idea is actually straightforward:
A client sends a request. A server processes it. The server sends a response.
Everything else builds on top of that.
Once you understand this lifecycle, Flask routes make more sense. JavaScript fetch() makes more sense. API debugging becomes easier. Authentication starts to make sense. Even things like Nginx, reverse proxies, databases, and deployment become easier to reason about.
And that's exactly why HTTP is worth understanding before jumping too deeply into frameworks.
In the next article, we'll take the next practical step and build a REST API with Flask from scratch, including routes, JSON responses, GET and POST requests, validation, error handling, and database integration.